注釈
Go to the end をクリックすると完全なサンプルコードをダウンロードできます.
シャドウ#
PyVistaでのライトとシャドウの使用方法をデモンストレーションします.
from __future__ import annotations

import numpy as np

import pyvista
from pyvista import examples

mesh = examples.download_dragon()
mesh.rotate_x(90, inplace=True)
mesh.rotate_z(120, inplace=True)
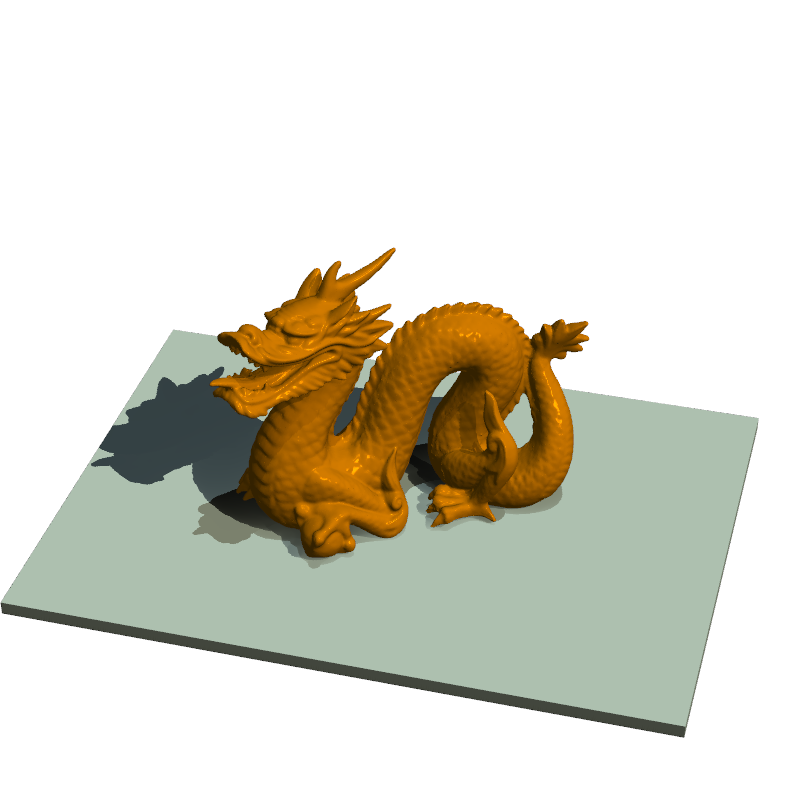
2つのライトを使用して,影をつけたStanford Dragonをプロットします.
注釈
特定のウィンドウサイズでシャドウをレンダリングする場合,VTKに既知の問題があります. window_size パラメータを試してみることをお勧めします. (1000, 1000) の初期ウィンドウサイズは,問題なく手動でサイズ変更できるため,正常に動作するようです.
light1 = pyvista.Light(
    position=(0, 0.2, 1.0),
    focal_point=(0, 0, 0),
    color=[1.0, 1.0, 0.9843, 1.0],  # Color temp. 5400 K
    intensity=0.3,
)

light2 = pyvista.Light(
    position=(0, 1.0, 1.0),
    focal_point=(0, 0, 0),
    color=[1.0, 0.83921, 0.6666, 1.0],  # Color temp. 2850 K
    intensity=1,
)

# Add a thin box below the mesh
bnds = mesh.bounds
rnge = (bnds.x_max - bnds.x_min, bnds.y_max - bnds.y_min, bnds.z_max - bnds.z_min)

expand = 1.0
height = rnge[2] * 0.05
center = np.array(mesh.center)
center -= [0, 0, mesh.center[2] - bnds.z_min + height / 2]
width = rnge[0] * (1 + expand)
length = rnge[1] * (1 + expand)
base_mesh = pyvista.Cube(center, width, length, height)

# rotate base and mesh to get a better view
base_mesh.rotate_z(30, inplace=True)
mesh.rotate_z(30, inplace=True)

# create the plotter with custom lighting
pl = pyvista.Plotter(lighting=None, window_size=(800, 800))
pl.add_light(light1)
pl.add_light(light2)
pl.add_mesh(
    mesh,
    ambient=0.2,
    diffuse=0.5,
    specular=0.5,
    specular_power=90,
    smooth_shading=True,
    color='orange',
)
pl.add_mesh(base_mesh)
pl.enable_shadows()
pl.camera.zoom(1.5)
pl.show()
複数の平面を貫通するライトを表示します.ライトの強度と shadow_attenuation を調整して,ライトが通過できる平面の数を変更します.
plotter = pyvista.Plotter(lighting=None, window_size=(800, 800))

# add several planes
for plane_y in [2, 5, 10]:
    screen = pyvista.Plane(center=(0, plane_y, 0), direction=(0, 1, 0), i_size=5, j_size=5)
    plotter.add_mesh(screen, color='white')

light = pyvista.Light(
    position=(0, 0, 0),
    focal_point=(0, 1, 0),
    color='cyan',
    intensity=15,
    positional=True,
    cone_angle=15,
    attenuation_values=(2, 0, 0),
)
light.show_actor()

plotter.add_light(light)
plotter.view_vector((1, -2, 2))
plotter.enable_shadows()
plotter.show()

ここでは,より低い shadow_attenuation 値を使用して,ライトがより多くの面を通過する方法を示します.
plotter = pyvista.Plotter(lighting=None, window_size=(800, 800))

# add several planes
for plane_y in [2, 5, 10]:
    screen = pyvista.Plane(center=(0, plane_y, 0), direction=(0, 1, 0), i_size=5, j_size=5)
    plotter.add_mesh(screen, color='white')

light = pyvista.Light(
    position=(0, 0, 0),
    focal_point=(0, 1, 0),
    color='cyan',
    intensity=15,
    cone_angle=15,
    shadow_attenuation=0.95,
    positional=True,
    attenuation_values=(2, 0, 0),
)
light.show_actor()

plotter.add_light(light)
plotter.view_vector((1, -2, 2))
plotter.enable_shadows()
plotter.show()

Total running time of the script: (0 minutes 8.268 seconds)